It was only about a month ago when I was writing my Blog about the CloudGateway that I wondered which route Citrix would take now that they acquired Zenprise, well… here it is… XenMobile, another Xen sibling sees the light! Lets jump right in… I had the opportunity to make use of one of Citrix’s demo environments to have a closer look at MDM, which is an awesome way to explore new and existing products by the way, if your company is a Citrix partner and has access I definitely recommend having a look. Besides that I used the Citrix E-Docs website as well as Citrix.com to find as much information as possible.
The main focus of this article will be on XenMobile MDM as the Mobile Solutions Bundle (one of the two editions available) focuses primarily on the CloudGateway which I already discussed in one of my previous blogs. Worth taking a look as well by the way :-)
MDM?
MDM stand for Mobile Device Management and it’s just that! Here’s what Citrix has to say about it: As per Citrix: XenMobile MDM is a robust mobile device management solution that delivers role-based management, configuration, and security for both corporate and employee-owned devices. Upon user device enrollment, IT can provision policies and apps to devices automatically, blacklist or whitelist apps, detect and protect against jailbroken or rooted devices, and selectively wipe a device that is lost, stolen, or out of compliance. Users can use any device they choose, while IT can ensure compliance of corporate assets and secure corporate content on the device.
Editions
There are two editions: XenMobile MDM and the Mobile Solutions Bundle. XenMobile MDM primarily focuses on (hardware) device management, more on it’s extensive feature set shortly. Every major platform is supported including: iPhone, iPad, Android, BlackBerry, Symbian and Microsoft Windows 8. It includes the XenMobile Secure Mobile Gateway (SMG) and XenMobile SharePoint Data Leak Prevention (DLP) as well as the XenMobile Mobile Service Provider (ZSM) and the XenMobile Remote Support Application Toolset.
SMG provides the ability to protect and secure mobile e-mail through MDM policies, it provides fine-grained access control of HTTP ActiveSync requests made by mobile devices against back-end Exchange Client Access Servers (CAS). DLP does the same for SharePoint access on mobile devices, again using MDM policies. It gives IT administrators control over the devices that have access to SharePoint data while Citrix Mobile connect, a native mobile app, provides the interface to securely view documents. The demo environment I used didn’t include the SMG or DLP. I do however have a screenshot on how and where it is configured within the MDM Device Manager as far as the SMG goes.
ZSM Lite is a component that enables access to query Blackberry and ActiveSync environments and provides the device and user information to Device Manager via the XenMobile Mobile Service Provider (ZMSP). ZMSP offers Web Services for Device Manager to query BES users and device and control operations like wipe and lock. The XenMobile Remote Support Application Toolset provides several tools to assist in the inspection, troubleshooting, and modification of remotely controlled handheld devices. The software is installed on a Windows-based computer that allows support personnel to take remote control of the Windows Mobile devices, unfortunately I don’t have any screenshots on Remote Support, I do on ZSM.
To give you an idea on how all these components interact, althoug ZSM and the XenMobile Remote Support Application Toolset aren’t visible, here’s a picture from one of the Citrix Whitepapers I used as reference.

Using a hardware load balancer like Citrix NetScaler in front of all the MDM components makes it more secure, the less components you have in your DMZ the better. This way you could also take advantage of additional NetScaler functions to further increase security. Of course it’s optional, you could totally do without if you like.
The Mobile Solutions Bundle combines MDM with the Citrix CloudGateway offering a complete enterprise mobility management solution. It includes AppController which lets you securely deliver Web and Software-as-a-Service (SaaS) applications, all mobile and HTML5 based applications and integrated ShareFile-based data. I don’t want to spend too much time on the Solutions Bundle to be honest, as mentioned I already covered the CloudGateway in one of my previous Blogs and that’s really what the Solutions Bundle is all about. It assumes you know your MDM stuff and adds the CloudGateway to the equation. So lets have a closer look at XenMobile MDM and the Solutions Bundle will pop up automatically from time to time.
So… Which one?
It al depends, do you want application level management, device level management, both? What type of applications will be deployed, web, SaaS, Mobile, HTML5 etc… For example, if you also want to integrate and publish Windows applications, Hosted shared desktops or VDI’s through XenApp and XenDesktop then you also need to implement StoreFront. There is also the choice of using SharePoint or perhaps ShareFile to share data. Below you’ll find an overview of all the features available and which edition you need to fulfil all your wishes.

Before we move on here’s another overview on MDM but this time with the complete, including StoreFront, CloudGateway suite integrated. This configuration gives you the total package, fully redundant and with XenApp published applications and XenDesktop VDI’s included.

Although MDM supports every major platform out there It’s important to note that when using the Mobile Solutions Bundle most of the new security features in CloudGateway are only compatible with iOS and or Android devices. That doesn’t mean that your apps aren’t securely delivered to your mobile device, because they most certainly are! The same goes for the XenMobile SMG as well, It lets users view encrypted attachments in a secure viewer and keeps sensitive corporate data from leaking outside of enterprise control on iOS and Android devices. I’m not completely sure about the SharePoint Connector, it uses its native Citrix Mobile Connect mobile app to provide a secure interface to view documents, I don’t know if it’s also supported on Windows mobile devices, BlackBerries etc…
Licensing
I’ll let Citrix do the talking on this one. As per Citrix: Citrix XenMobile MDM edition is licensed under a per-user or per-device model. User licensing is based on how many unique users have registered devices on the administrative device management server. Device licensing is based on how many unique devices are registered on the administrative device management server. XenMobile Enterprise edition is licensed under a per-user model only. For specific consumption options and more detial see: support.citrix.com/proddocs/topic/xmob-dm-8/xmob-dm-licensing-wrapper-con.html There is also something called ‘Secure Device’ which can be included in your license, if it is, it’s automatically activated during installation, it provides a strong level of security for user devices, more info: support.citrix.com/proddocs/topic/xmob-dm-8/nl/ja/xmob-dm-manage-securityid-generaloptions-con.html?locale=ja
Install and set up
When it comes to installation and set up the main component is the Device Manager, the rest is optional. Below is an overview of all components that can be installed most of which we already dicussed briefly. No deepdives just some basic info where applicable.
- Device Manager
- Secure Mobile gateway
- Data Leak Prevention
- Multi-Tenant Console
- Remote Support Tools
- ZSM Lite
Device Manager
Device Manager is installed on a Microsoft Windows 2008R2 server, no 2012 support just yet. Installing is easy, double click the Device Manager executable installation file, select full install and follow the setup wizard. This will install:
- Device Manager server
- Repository Database (PostgreSQL) which will auto create
- Integrated web application server (Apache Tomcat) hosting the Device Manager server.
You can also use a SQL database if you like, if that’s the case then clear the PostgreSQL check box in the list of components during the installation wizard. Device Manager server runs on a Apache Tomcat web server which is configured as a Windows service and relies on Java software (Java virtual Machine).

When the initial installation is finished it’s time to integrate, in our case, Active Directory which will simplify user and device management. First connect to the XenMobile Device Manager by typing in something like: FQDN or IP address / zdm and logon by using the Administrative account created during installation. To create an LDAP connection click the Options dialog box in Device Manager. The screen below appears after you selecet LDAP configuration in the main options menu.
![]()

SMG
Once installed and set up it needs to be configured from Device Manager, below you’ll find a pic with the options available. More information on the Secure Mobile Gateway can be found on Citrix’s E-Docs website: support.citrix.com/proddocs/topic/xmob-smg-80/xmob-smg-intro-wrapper-con.html

DLP
I couldn’t find any other information on Data Leak Prevention except for what is does and how it works. It’s also a NetScaler feature but that’s not what is meant here. I’ll try a Google later this week and see what comes up.
Multi-Tenant Console
A web-based console that allows consolidated management of multiple XenMobile MDM servers. The Multi-Tenant Console is useful for managed service providers and enterprises with multiple distributed entities and to administer several physical XenMobile servers from a single site. Each of those servers can run multiple instances (also called tenants) of XenMobile MDM Manager that are independent from each other.
The complete installation of the XenMobile Multi-Tenant Console requires additional installations of the following third party tools: Java JDK, Grails web application framework, Google Web Toolkit, and PsTools. All three of these application distributions are included in the Multi-Tenant distribution.
More information can be found on: support.citrix.com/proddocs/topic/cloudgateway/xmob-multen-landing-page-con.html Just know that a ‘Tenant’ is a server with XenMobile MDM installed on it the rest speaks for it self.
Remote Support Tools
Not much I can say or show on this topic. As mentioned it allows support personnel to take remote control of the Windows Mobile devices. I can’t imagine the tools being to complicated, will post an update as soon as I get my hands on them.
ZSM
Blackberry and ActiveSync management, nice! Installation is easy (isn’t it always), double click the installation file and follow the install wizard. Again, install on a Microsoft Windows Server 2008 or 2008R2 machine, 32 or 64 bits, no 2012 supported. There is a bit more to it when it comes to configuring Blackberry and ActiveSycn monitoring and the ZSM Lite service account, but it’s pretty straight forward just have a look on the Citrix E-docs website. When the ZSM server is set up you need to enter the URL of the ZSM Mobile Service Provider inside of Device Manager in the Options dialog box to enable ZSM Lite to work with Device Manager and enable Lite management of BlackBerry devices and ActiveSync users from your BlackBerry Exchange Servers (BES), this is how it looks:

The Mobile Service Provider Web Services is configured on the ZSM server to provide web services to Device Manager and gather information about BlackBerry and ActiveSync users in ZSM. The web services interfaces use a baseline / delta model. A baseline update is done when the service is being defined or in case of errors. Delta updates occur every 5 minutes.
Dashboard
The Dashboard gives you a high level overview of all devices, each section of the Dashboard displays a unique view of the devices you manage. You can use the Dashboard to do the following:
- Send notifications
- View charts:
- Devices by platform
- Managed devices by platform
- Unmanaged devices by platform
- Etc…
- View Dashboard AlertsCreate a custom dashboard
- New enrollments
- Non-compliant devices
- Inactive devices
- SMG blocked devices
- And more…
Devices
Before enrollment can complete MDM expects that all devices are added to Device Manager, the client software / Agent, a.k.a. Connect Client App, is installed and user accounts are present. Adding a device can be done in multiple ways: manually one by one, by Importing a list of devices from a file (Many mobile operators or device manufacturers provide lists of authorized mobile devices), using the Device Provisioning tool (Windows Mobile and Symbian devices only, see the Citrix E-docs website for more info, kind of a lengthy process) or, last but not least, through enrollment.
When your license includes ‘Secure Device’ it offers the ability to autodiscover devices and add them to Device Manager. Although this might sound self explanatory I’d like to know what takes place under the hood, unfortunately there’s no documentation available. Adding a device manually is as simple as clicking ‘New Device’ and choose what (vendor) type of device you want to add. This screenshot also gives you kind of an idea on how the interface looks.

Next a screen pops up asking you for the IMEI or Serial number. Once entered click OK and you’re done as far as adding goes, now it’s ‘known’ by the system (added to the database). Editing works the same way, select a device and click ‘Edit’. It’s important to note that although the device is ‘known’ its not bound to a user in any way, this happens during the enrollment process. User accounts represent the users of the mobile devices and they are associated to devices by Device Manager as part of the authentication process.
Before a device can be remotely managed an Agent (Connect Client App) must be installed. This can be done in two ways one of which is through enrollment. Using this method you need to specify the type of device, Android, iOS etc… if it’s company or privately owned (on the General tab) and specify a user account name, this can either be a local user or an Active Directory based user, the user must already exist. Optionally you can also fill in the IMEI or Serial number on the third tab, this will automatically add the device to the Device Manager database during enrollment as apposed to the manual process mentioned above, it’s basically the same process.

Agents can deployed or downloaded using predefined templates, the same goes for the enrollment itself and the enrollment conformation as you can see above. To start, the box next to ‘Notify users immediately’ needs to be checked, although enrollments can also be created and send out later by manually right clicking the saved enrolmend and choose Notify from the menu. Next, select your templates, enter a phone number and pick you carrier. There is however one important step that must be taken before all of this will work and that’s configuring a Notification server (SMTP for example) within the Device Manager Options (no screenshots, sorry). Ones that is done you’re good to go.
A bit more on enrollments
Depending on the enrollment mode you choose your user(s) will receive one or multiple e-mails with an invitation web address to enroll the device, a download link to open or install the Agent, and optionally an E-mail with a one time PIN number that needs to be entered together with an AD user account name and password. These three E-mail will only be generated if you choose the High Security enrollment mode. There are 7 modes in total, check: support.citrix.com/proddocs/topic/xmob-dm-8/xmob-dm-connect-config-enroll-mode-con.html For example, there is also the Invitation URL enrollment mode which combines the above three E-mails in just one URL and achieves the same result, just less secure. Having a look at the whole process, it’s not just the device that gets enrolled but the user as well. Once the Agent software is installed it takes care of the device’s communication with Device Manager from there on, completing the enrollment process.

Strong ID enrollment
Depending on your license, it could include ‘Secure Device’ which adds some extra security capabilities. When Secure Device is included in the license, it is automatically activated during installation. Strong ID is one of those extra security features, it is a form of 2 factor authentication used to provide an extra layer of extra security when enrolling a device. Devices cannot enroll until the device’s serial number or IMEI is known. When you enable Strong ID, Citrix recommends enabling the character string to be 8 characters in length. A Strong ID is generated based of off the devices serial or IMEI with a maximum of 8 characters, if enabled.
When users are ready to enroll their device, users need to call support personnel and give the serial number or IMEI. Support personal can then provide the Strong ID from the device properties.
APNs
Ok, that’s just about it when it comes to adding devices, enrollments and Agent software, but… There is one important step you need to take when it comes to the enrollment of iOS devices! As per Citrix: Apple Push Notification service (APNs) is the Apple service that enables other software or apps to send push notifications to iOS devices. In order to enable this feature and allow for Device Manager to communicate with and manage users’ iOS devices, you need to request an APNs certificate from Apple. Then, you need to import the certificate to Device Manager before you can enroll iOS devices into device manager. Check the E-Docs website, its well documented: support.citrix.com/proddocs/topic/xmob-dm-8/xmob-dm-config-requesting-apns-con.html. There is a separate app for enrolling iOS devices called Citrix Mobile Enroll for iOS which is the equalifent of the Connect Client App.
Back to the Agent install
There is second way of deploying agents and that’s through a Client Installation Link. This can also be initiated from the enrollment tab in Device Manager, just click new enrollment and select new MDM Client Installation Link, believe me it speaks for it self, after doing so you’ll end up with this:

Again, a Notification server is needed for this to work. This can be used to invite users to enroll there devices, install client software etc… by pointing them to a location where everything is explained in more detail. You could also include a download link to the agent software, it’s up to you. XenMobile MDM expects that the device is already ‘known’ in it’s database before an Agent gets installed.
Revoke, Lock, Wipe, Delete…
A short summary. For devices to be remotely manageable it must first be ‘known’ by Device Manager, so a manual or automated add, then the Agent software needs to be installed which is done, in most cases, during the enrollment process and the device must be bound to a known user account completing the registration and enrollment process. Once all that is out of the way you can configure and apply all kinds of policies, deploy applications, add files and folders and more. That’s not all, have a look at the next screenshot to give you an idea on how easy it is to manage a device remotely once the correct infrastructure is in place.

Users
Users are associated to devices by Device Manager during the authentication process. When enrolling devices, see one of the previous screenshots above, you need to fill in an existing user account, this can either be locally configured or Active Directory based. Adding and administering user accounts locally is pretty straight forward.

Go to the ‘Users’ tab and select or create the group in which you want to create a new user. Click ‘New User’ fill in a user name, password plus confirmation and select a user role, finally you click create and guess what happens… It’s worth mentioning that Device Manager applies resources to groups of users not individuals, except during device enrollment.

Device Manager implements four default user roles to logically separate access to system functions, as shown in the following table. You can use role-based access control (RBAC) to create new user roles with permissions to access specific system functions beyond the functions defined by the default roles.

Earlier during the install and set-up of Device Manager we already discussed (LDAP) Active Directory integration. When the primary connection parameters are entered you also need to configure a groups / role mapping that will hold the XenMobile roles / users. Users you add into those groups, through AD users and computers for example, will show up in Device Manager as you can see a few screenshots back. You cant add or edit users to AD groups using Device Manager.

Policies
Although it does depend on the type of device you are using (iOS and Android are leading) the possibilities are almost endless, there is very little you can’t control using policies. I didn’t had the time to look at them all so I browsed through and took my screenshots, I think you’ll get the point. From the ‘Policies’ tab, select your device and choose the policy you want to configure, it’s probably a good idea to know on forehand what you would like to accomplish using policies :-)

And because it all depends… I won’t go over all the possibilities out there, I’ll let the following screenshots speak for themselves. Here’s a Tunnel policy configuration, if I’m not mistaken it’s on an Android device.

Samsung Restrictions… I just had to take a look at that one, a good example on what is possible when it comes to the physical device itself. It allows you to take total control, if that’s your thing. Locking down machines using these settings might be something you do if they’re Company owned for example, but it doesn’t really say come and bring your own device if you ask me, but hey… that’s all up to you!

Network settings, Applications, passwords and more, it’s all configurable with the same granularity. Here’s another example on an Android password policy. Samsung just announced it’s partnership with Citrix to provide Knox, a new secure implementation of Android that will soon be available on Samsung leading smartphones, so… to be continued!

Files and applications
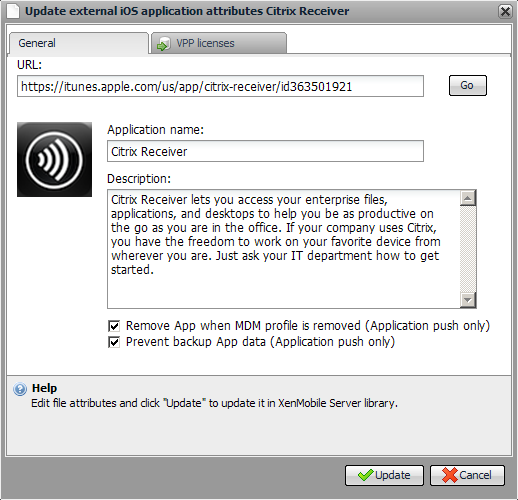
Files and applications are basically added and administered the same way as devices, users, groups etc… When you add an application you can browse your system and network (this also applies when adding in files) or connect up to the iTunes apple store for example or Google Marketplace to name a few. Files can also include scripts, Registry keys, XLM configuration files… you name it.

Depending on the application you add it might have some properties that can be edited like licenses or some other app specific parameters. Although Citrix receiver probably isn’t the best example, it does give you kind of an idea on how it looks.
Deployment
So… devices are enrolled and bound to users, we have our policies set up, files and applications ready to go… now what?! MDM uses packages to distribute resources to mobile devices, you can create as many as you like. They can contain, applications, files, policies of all sorts, scripts etc…

When creating a new package or edit an existing one, you’ll see all resources available for distribution. Name it, assign it, select the resources you’d like to push out, configure a schedule and finally have a look at some of the deployment rules. Then… Go!

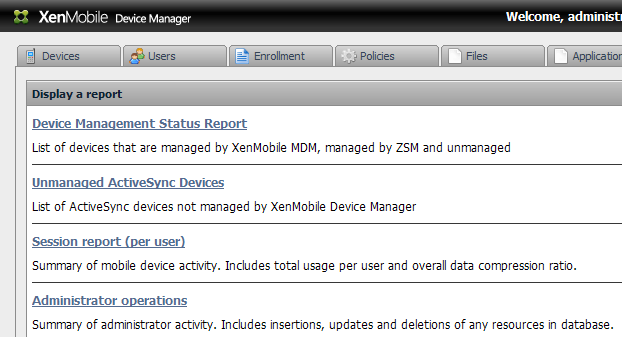
Reporting
Last but not least is reporting. I didn’t spent to much time on this one to be honest, there wasn’t that much to report on. Here is how it looks, when you get your hands on MDM take some time to browse through this section and see what might be useful in your case.
Loose ends
There are still a few topics I didn’t cover (in more detail) like:
- Hard and software system requirements
- Prerequisites before installing Device Manager, firewall ports etc…
- Blacklist and or whitelist apps
- The use of certificates (PKI) managing security and identity in Device Manager
- Configuring automated actions in Device Manager
- Back-up and Restore of Device Manager, installing patches
- Specific network optimizations, mostly set through policies
- Self Help Portal enrollment
- Known issues
Although most of it is no rocket science, the list does include some topics worth taking a look at. Especially the prerequisites before install, the PKI and automated actions might be interesting. I wanted to primarily focus on the extra’s that MDM has to offer and although I’ve probably mist an option or two I think you get the general idea, at least I hope!
Bas van Kaam ©
Reference materials used: Citrix.com and the Citrix E-Docs site

You can also cover role based access control and self help portal in your next article.
The SMG filtering is cool so it worth going through some details.
With the change in licensing from subscription (it is still there) to perpetual, it makes the selling a bit easier especially with the per user option.
Thank you Nighto, I do mention RBAC but I guess I could have gone in a bit deeper. The Self Help portal is one of my ‘Loose Ends’ at the bottom, indeed worth taking another look at in some more detail! With so many cool new features it’s hard to give them all the attention they deserve :-) Thanks again!
I’m thinking you meant ‘StoreFront’ and not ForeFront :D
I’m glad somebody is paying attention. Hahaha… you are right John! My bad. Let me know if you find anything else :-)
I should have said first – ‘Great article!’ – because you did a great job. Thank you.
Does in MDM , the personal apps are made invisible once user starts using ENterprise apps. How is it made different?
Hi Donna,
I’m not exactly sure what you mean but… The personal and Business applications are separated from each other by something called the MDX Vault, it holds all the business applications which are then manageable from AppController. This only applies to mobile applications not XenApp and or XenDesktop content. Also, MDM primarily focuses on the hardware side, the application part is taken care of by AppController, policies etc.. included. Apps must first be ‘Wrapped’ or made ‘Worx enabled’ is probably a better term since XenMobile was re, re-leased last month. This way they can make use of the earlier mentioned MDX Vault among other MDX features. I’m not a 100% sure but I don’t think personal apps will be visible from AppController. Does that answer your question, or at least partly?
Regards,
Bas.
So, Can I go only for MDM Edition? So how does this helps my enterprise?
Sure you can, there are three editions, have a look here: http://www.citrix.com/products/xenmobile/features/editions.html MDM lets you manage your mobile devices within your enterprise, keeping them secure and up to date. For example, once your devices are ‘enrolled’ and know by the system you can manage them remotely from the MDM console, you can configure and apply al sorts of policies controlling: Passwords, WiFi settings, VPN’s, Encryption levels and more. Policies that can be created differ per device manufacture, but if you look at Apple iOS and Android devices there isn’t much you can’t do. You can also lock or remote wipe a device for example, powerful tooling. Adding applications is also possible, but the management possibilities are reasonably limited, for that you will need to upgrade to the App Edition, which is basically the AppController mentioned earlier. Read this Blog, perhaps again, it gives you an good idea on what’s possible with ‘just’ MDM.
Thank You Bas. But Still I have Queries on this… Can you give me your email id?
It’s in your inbox :-)
Hi Bas,
Just want to add about Worx mail DLP, did you find any thing:
I searched a lot and below the result: there no DLP by name only the below polices can work as DLP.
Cut and Copy
Blocks, permits, or restricts Clipboard cut and copy operations for the app. When you choose Restricted, the copied Clipboard data is placed in a private Clipboard that is only available to MDX apps. Default is Restricted.
Options: Unrestricted, Blocked, or Restricted
Document exchange (Open In)
Blocks, permits, or restricts document exchange operations for the app. When you choose Restricted, documents can be exchanged only with other MDX apps. Default is Restricted.
Options: Unrestricted, Blocked, or Restricted
Policies to Set App Restrictions
Disable diagnostic logging
Block camera
Block SMS compose.
Block screen capture
Block device sensor.
hi Where can I find the most commonly implemented policy list for IOS and Android user devices.
Hi Ali,
I’m not aware of such a list, I had a look on the E-Docs website but was unable to find anything. Will give it another search though. Please do let me know in case you find anything first.
Regards,
Bas.